Cant Upload to Souncloud From Ableton Find Save
Importing & Exporting In Ableton Live
Wondering how to consign your project as an MP3 file? Non sure how to import parts from ane project to another? This guide features a serial of curt tutorials explaining the best ways to import and export item elements of your Ableton projects.
- | How To Import Stems
- | How To Export Stems
- | How To Export As An MP3 File
- | How To Consign MIDI
- | How To Import Tracks From Another Project
This is the complete guide to importing and exporting in Ableton.
Without further adieu, let'southward get started!

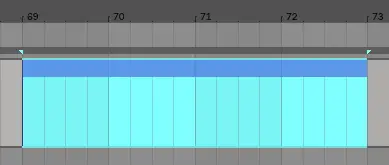
| How To Import Stems
Importing stems is the first pace to creating an official remix or mixing or mastering a completed project that has previously been bounced to stems. Ableton makes information technology easy to bulk insert multiple audio files onto individual tracks.
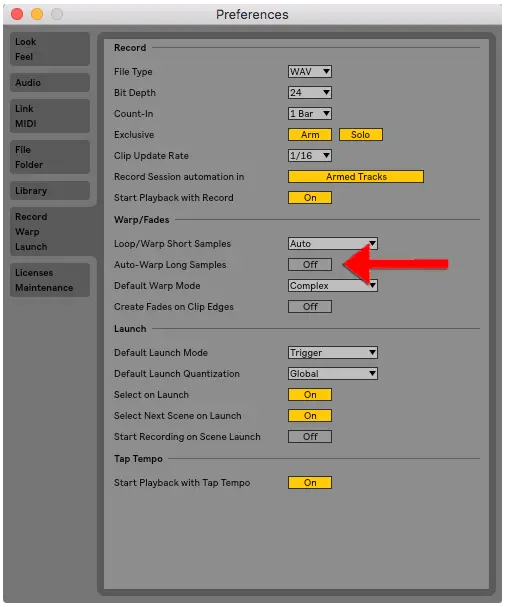
1. Turn Off Motorcar-Warp Long Samples
Open Live's Preferences and select the 'Tape Warp Launch' tab. Adjacent, plough off Auto-Warp Long Samples to ensure your stems playback every bit normal and aren't affected by Ableton'south machine-warp function.
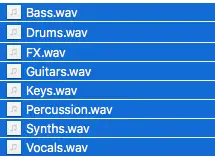
2. Observe Your Stems & Select All
Access your drove of stems from either Ableton'south Browser or from Finder on Mac or Explorer on Windows and so select all.
3. Drag & Drop Your Stems
Drag and drop your stems into the arrangement view of your Ableton project . Make sure to concord down [COMMAND] on Mac or [CTRL] on Windows to ensure each stem is imported onto its ain audio track.

4. Adjust The Tempo
Finally, set the tempo of your project to match that of your stems.
![]()
| How To Export Stems
Ableton's export window features an impressive stem export functionality. Providing mix engineers with stems gives them the ability to create the all-time possible mix-down or master of your runway. Give other producers complete creative freedom to remix your rail by providing them with stems. Export your vocal's layers into private audio files past following these simple steps:
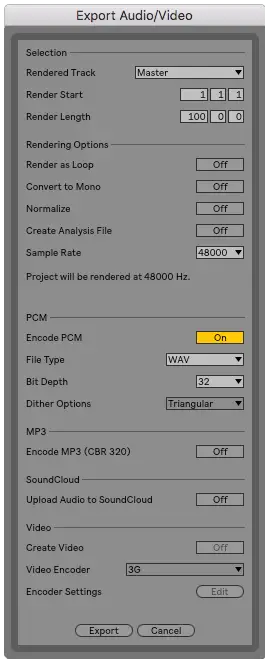
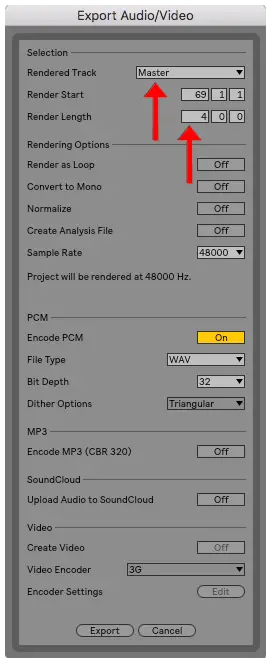
1. Open up The Export Window
Outset by selecting your unabridged project by pressing [CMD + A] on Mac or [CTRL + A] on Windows. Next, open the export window in Live'southward Preferences or pressing [CMD + Shift + R] on Mac or [CTRL + Shift + R] on Windows.
2. Adjust The Render Settings
Click the 'Rendered Runway' drop-downwards box under the Selection category and set to 'All Private Tracks'. Ensure that the 'Return Showtime' and 'Return Length' values span the duration of your track. These values are measured in bars and beats.
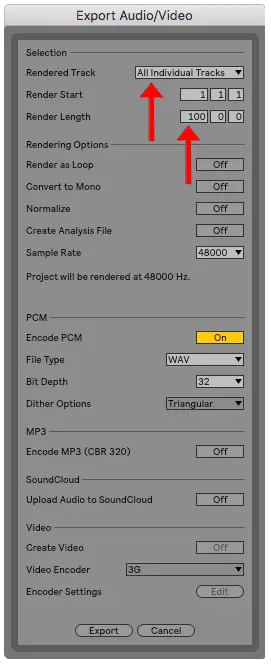
3. Deselect Settings
Plough off 'Render As Loop', 'Convert to Mono' and 'Normalize'.
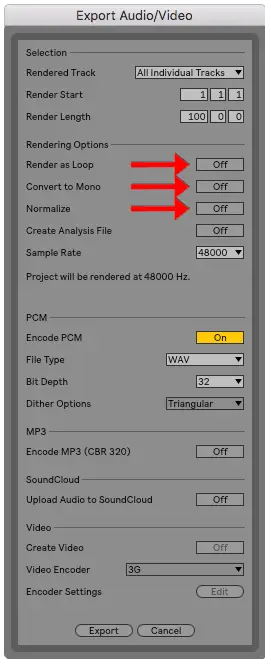
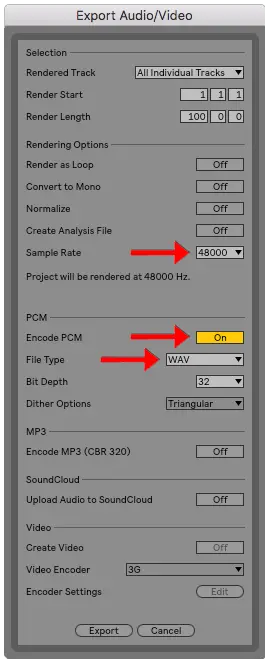
4. Concluding Settings
Ensure your 'Sample Rate' is set to a minimum of 48,000 samples. Finally, enable 'Encode PCM' and select either WAV or AIFF as your export file type.
5. Export
Select the 'Export' push button and so wait for Ableton to relieve your stems as individual audio stems.
![]()
• Additional Information
If you program on distributing your stems, selecting 'Create Assay File' will salve other Alive users time when they import your stems. Export your stems at a bit depth of 32 $.25 to avoid doubling dithering of the audio.
| How To Consign As An MP3 File
Ableton only allows users to export uncompressed, maximum quality audio and while an MP3 file is conveniently smaller, the audio quality is not as high. Although Ableton does not provide a direct fashion to export your project as an MP3 file, there are a handful of unlike ways to convert the available consign file types (WAV and AIFF) to MP3.
| Online Audio Converters
This method allows for quick and easy conversion of WAV and AIFF files to MP3 without the need for additional software. Simply upload your file, select the output file type and so download your song in your preferred file type. Using an online audio converter usually doesn't take any longer than a few minutes. Search the internet for an Online Sound Converter and find the one that suits yous all-time.

| Audio Conversion Software
In that location is a diversity of free and paid audio conversion software available online. Using software removes the need to upload and download your song which could salvage valuable time depending on your internet speed. A simple search on Google or your computer'south app store volition give you an countless amount of options, including the ability to convert your WAV or AIFF file to formats other than MP3.

| How To Export MIDI
So you've created a fantastic melody or chord progression that doesn't quite accommodate your current project. Ableton makes it possible to export MIDI clips then yous can use your MIDI creations in a time to come production. Beneath is the best way to create and export a MIDI clip.
1. Create Your MIDI Clip
If you take not created one, create a MIDI runway by pressing [COMMAND + SHIFT + T] on Mac or [CNTRL + SHIFT + T] on Windows. And then select the number of bars you would like your prune to go for using the arrangement view and so press [Command + SHIFT + One thousand] on Mac or [CNTRL + SHIFT + Grand] on Windows to create a MIDI prune.

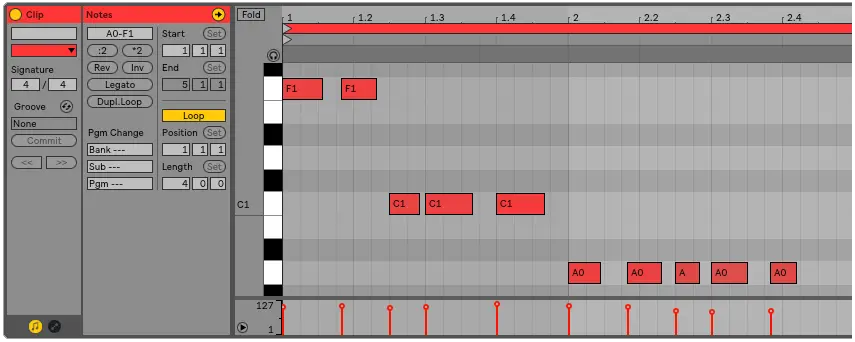
2. Create Your MIDI Pattern
Double-click your new MIDI prune to access the piano roll. Record or describe in your melodic, harmonic or rhythmic MIDI pattern.
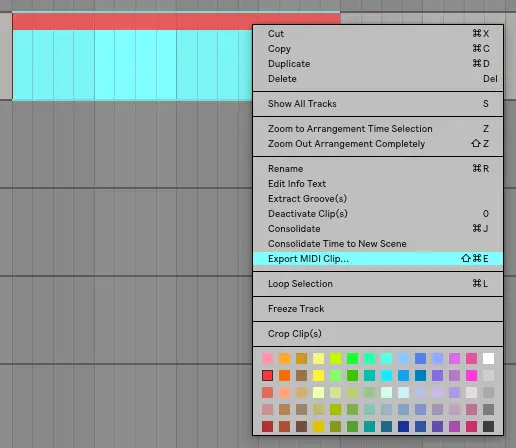
3. Export Your MIDI Clip
Finally, right-click the colored part of your MIDI clip and select 'Export MIDI Clip.'
| How To Export MIDI To Sound
If you desire to store or distribute your MIDI clips as audio or create your own sample packs, y'all'll need to know how to export MIDI to audio. Manipulate audio, create reverb reverses or simply use your MIDI ideas in hereafter projects by following these simple steps:
one. Select MIDI Prune
Click on the colored area of your MIDI clip or select the region yous wish to export to audio.
2. Solo MIDI Track
Select the Solo button on your MIDI prune's track. The Solo button should now announced blue.

3. Export
Select the 'File' menu and then click 'Consign Sound/Video' or just printing [Control + SHIFT + R] on Mac or [CNTRL + SHIFT + R] on Windows. Ensure the 'Render Showtime' and 'Return Length' is equal to the region of your MIDI prune and 'Rendered Track' is fix to 'Master'.
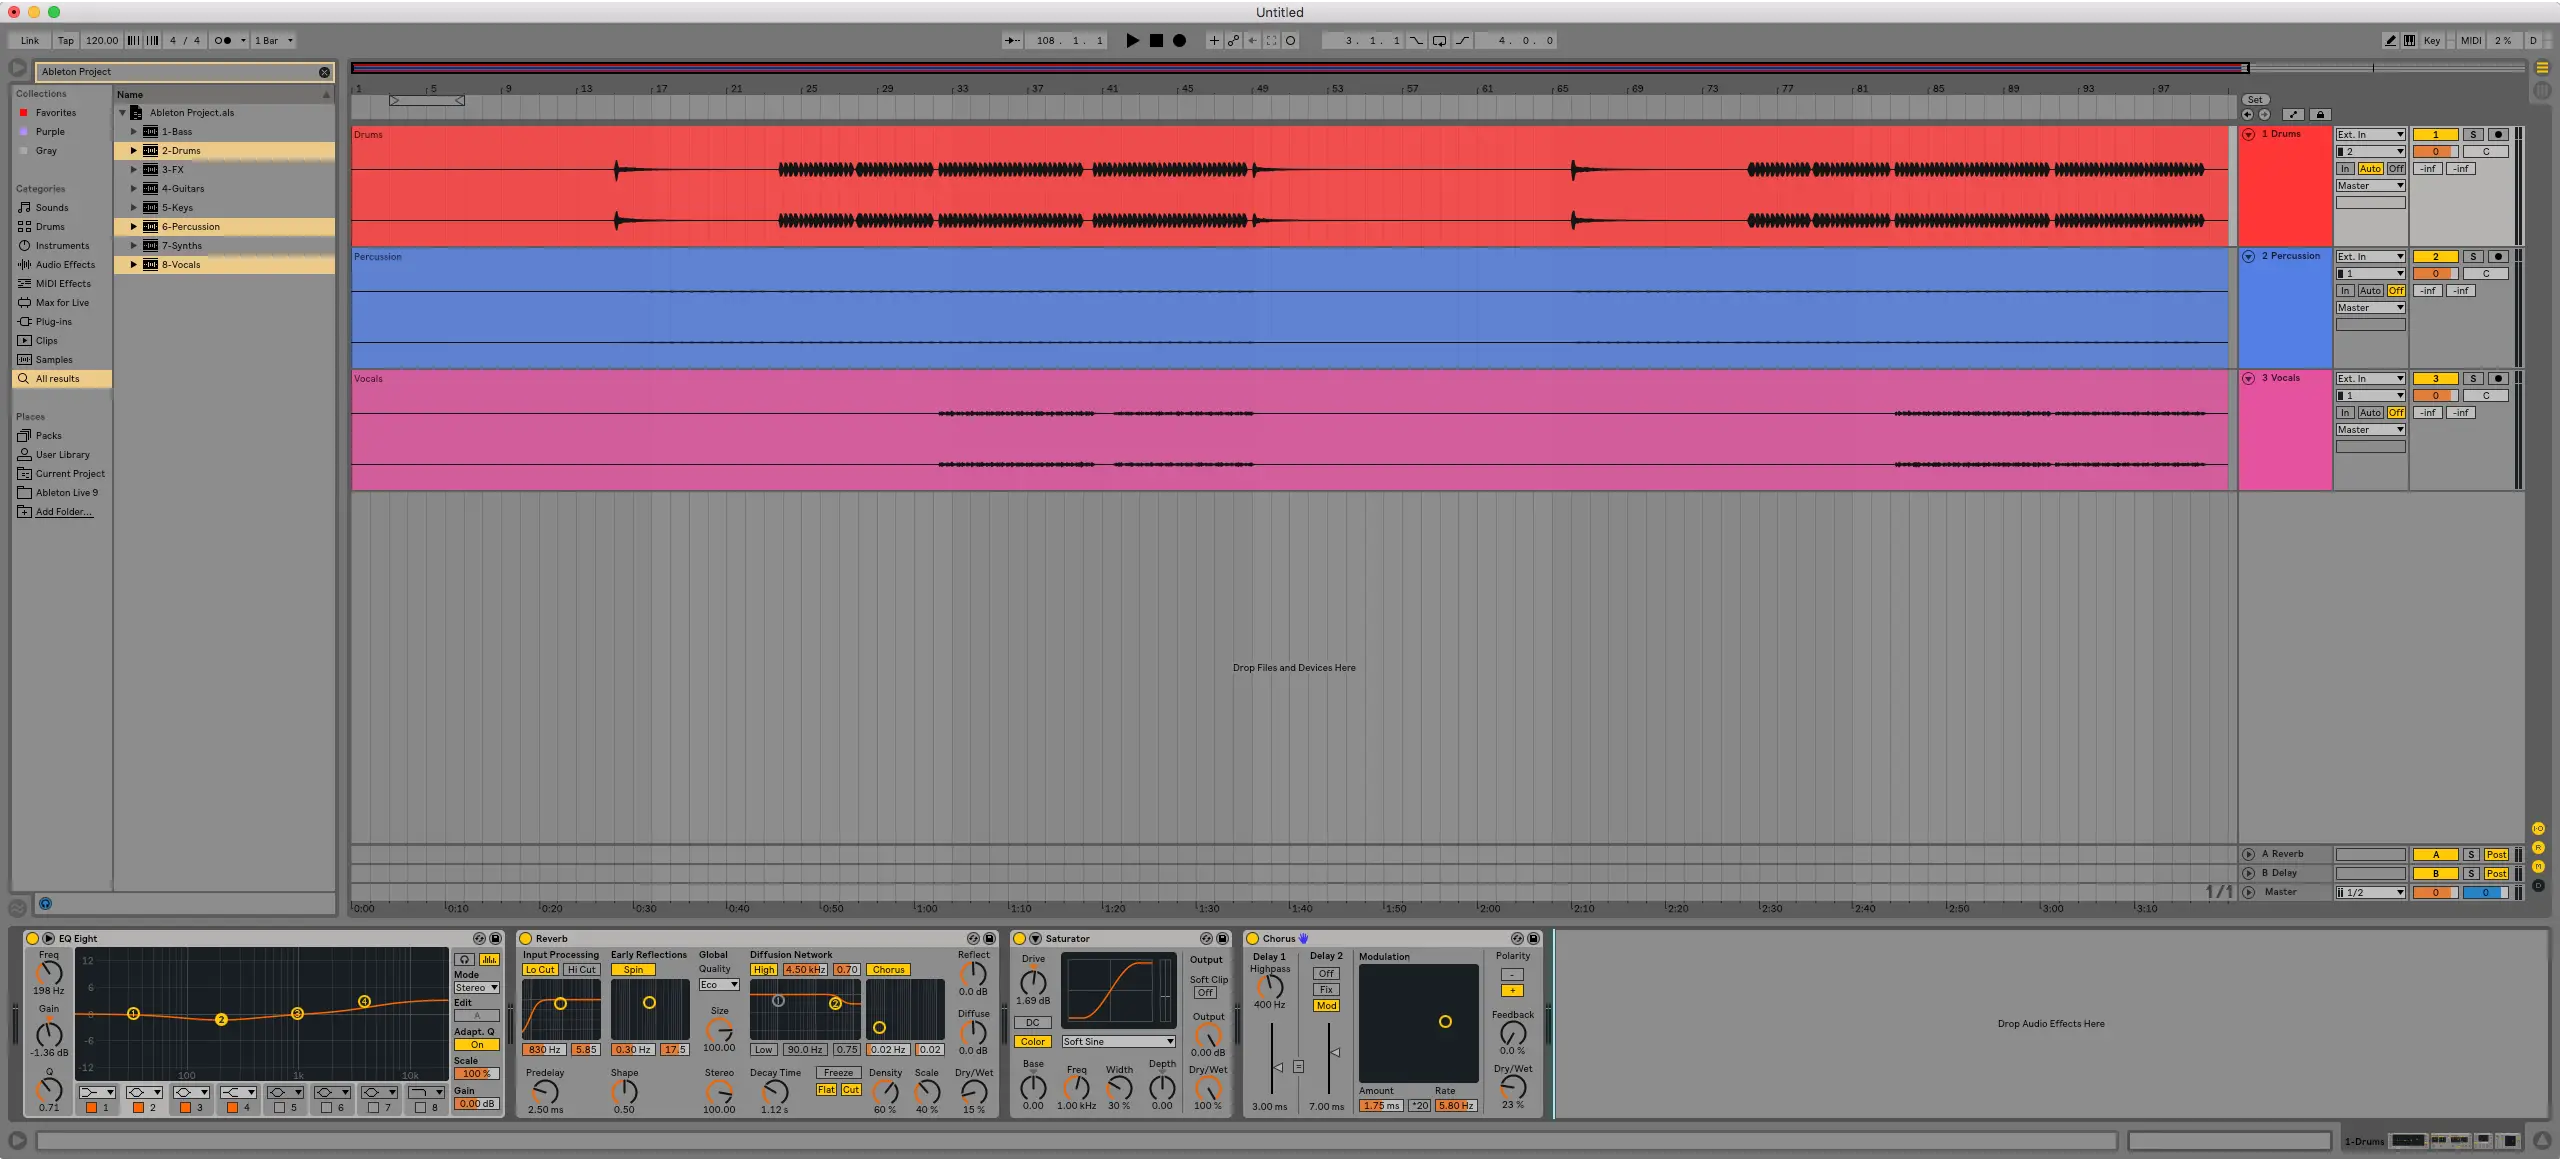
| How To Import Tracks From Another Projection
Ableton makes it possible for users to chop-chop and easily integrate elements from your previous projects into your current projection. Merge projects or import individual tracks into your current alive set by following the steps below:
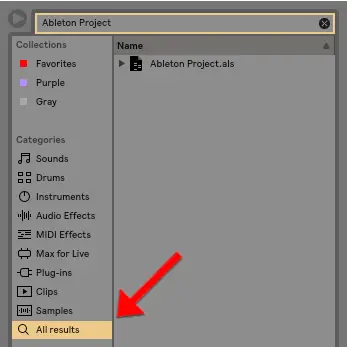
1. Search For Your Project
Navigate to Ableton's Browser and search for the championship of the project you lot wish to have elements from. Make sure to select 'All Results'.
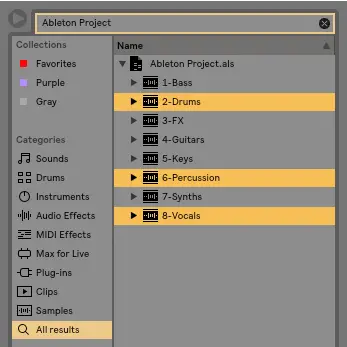
two. Select Tracks
Select the drop-down arrow beside your project's title to reveal all the layers of the project. Select a layer or select multiple layers by holding down [Control] on Mac or [CNTRL] on Windows.
3. Add together To Your Current Project
Drag your layer(s) into your project. They will now be added exactly how they appeared in your previous project, including all plugins used.
Want To Know More?
Here at Live Aspects, nosotros have dozens of useful lessons and tutorials created to heighten your music production skills and assist speed up the learning procedure. You can admission our huge range of music theory lessons and production tips and tricks here.
![]()
Source: https://liveaspects.com/importing-and-exporting-in-ableton/
Belum ada Komentar untuk "Cant Upload to Souncloud From Ableton Find Save"
Posting Komentar